GOQii

Blog

  • HOME
  • HEALTHY LIVING
  • FITNESS
  • HEALTHY RECIPES
  • USER STORIES
  • KARMA
  • BUY GOQii

January 7, 2021 By Saba Mirza Leave a Comment

Tips to Get Rid of The Winter Itch

Winter Itch

Do you experience this sudden itching sensation during winter? There’s in fact, a term for it – it’s called the Winter Itch! Generally, it is more prominent on your lower legs, arms, hands, abdomen and areas of friction like the soles and ankles. It is caused by dryness of the skin due to cold weather. When humidity levels drop, the dry and cold weather cause loss of water from the superficial layer of the skin (epidermis).

Itching is the key symptom of dryness. If left untreated, the Winter Itch may lead to scratching which can cause a breakdown of the skin layer, creating complications such as Eczema, Bacterial Dermatitis, Cellulitis, etc. Fortunately, the Winter Itch is just a beginning and can be prevented and treated with some simple measures.

Tips to Reduce the Winter Itch

  1. Coconut Oil: The saturated fatty acids present in coconut oil are natural emollients which moisturize the skin by filling the gaps in dry skin, making it smooth. It significantly improves skin hydration and increases the lipid layer in the epidermis. It is one of the safest moisturizers which can even be applied to sensitive areas of skin like underneath the eyes or around the mouth.
  2. Oatmeal Bath: is an age-old remedy which has found its scientific backup from various research studies. Colloidal oatmeal is anti-inflammatory and rich in antioxidants. It helps in reducing inflammation, soothes the skin and binds with it to make a protective barrier. Make sure the water is warm and not too hot so that it doesn’t make the skin drier. You can make your own colloidal oatmeal at home by blending raw oatmeal finely in a food processor. Do apply a moisturizer after taking the bath to lock the protective barrier.
  3. Peppermint Oil: Peppermint, the essential oil, contains menthol and is found to be quite effective in treating itchy skin. Its cooling effect instantly soothes the skin and reduces the urge to scratch.
  4. Aloe Vera Gel: Aloe Vera is a natural coolant and moisturizer which you can easily grow in your kitchen garden! Clean and wash the Aloe Vera before applying to avoid any pollutants and dust particles. Aloe Vera’s wound healing property may help in quickening the healing of broken, rough patches of skin. You can mix it with essential oils like mint oil, jojoba oil and coconut oil as well to enhance its effectiveness!
  5. Honey: Because of its anti-inflammatory, moisturizing and healing properties, honey is found to be quite effective in reducing skin itching and irritation. You can directly apply it on the affected part, keep it for a few minutes and wash thoroughly!
  6. Apple Cider Vinegar: According to some studies, taking a bath with Apple Cider Vinegar mixed warm water has been found to be very soothing and hydrating for the skin. It is particularly helpful in relieving an itchy scalp. Dilute the Apple cider vinegar in water with 1:1 ratio, apply to the scalp and rinse thoroughly after drying with warm water. The acetic acid present in it makes it a natural wound healer and disinfectant.
  7. Consume Antioxidants and Omega 3 Fatty Acids: Winter Itch is more prominent on damaged and unhealthy skin. Foods rich in antioxidants can minimize the damage from toxins and help the body make more healthy cells! Antioxidants are abundantly present in seasonal fruits and vegetables available during the winter season. Some of them include berries, carrots, beans, peas, tomatoes, lentils, etc. Foods rich in Omega 3 fatty acids like fish, seeds and nuts contribute to healthy and glowing skin!

Some additional measures you can take include:

  • Avoid hot and long baths.
  • Use a gentle soap and mild cleanser
  • Avoid direct contact of the skin with certain materials which can irritate the skin. For instance, woollen cloths and nylon among others. Instead, wear natural, breathable material like cotton.
  • Try a humidifier at home
  • Keep yourself well hydrated by drinking a good amount of water.

We hope these tips help you relieve the Winter Itch and keep your skin glowing and healthy! How do you deal with the Winter Itch? Leave your thoughts in the comments below.

For more on winter, check out Healthy Reads or tune in to LIVE sessions by experts on GOQii Play. 

#BeTheForce 

December 15, 2020 By Saba Mirza 1 Comment

Tea is for Therapy

tea

When you hear someone say tea, you are bound to picture that wonderful, aromatic concoction made from milk, sugar and tea leaves. Have you ever felt a slight amount of guilt for loving this enchanting drink when the rest of the world is telling you it is unhealthy? Tea has evolved so much over the centuries from the first time when it came to India, that its original shape and taste is only restricted to additives and the harmful effects of the additives are attributed to tea.

Does it feel like we’ve forgotten the true meaning to tea, which as per Merriam Webster dictionary is – “an aromatic drink, prepared by soaking the part of various plants (such as leaves or roots) and is used medicinally or as a beverage!’’

Here I am enlisting a few authentic teas which have some magical benefits on your health!

1. Wake Up Call Tulsi Tea
Tulsi or holy basil is one of the most sacred herbs in India, also known as “queen of herbs”. Chewing on a few Tulsi leaves is beneficial for you! Imagine sipping on hot Tulsi tea in the morning! The antioxidants in Tulsi Tea clean your body off all the accumulated toxins after the wear and tear which happens during deep sleep.

Its metabolism booster effect helps in optimizing your fasting blood sugar levels while anti-cortisol action is great to reduce the levels of stress hormones in the body, making you ready to welcome the day with a super refreshed and rejuvenated mind!

How to Brew: Take a cup of water in a saucepan. Add 2-3 Tulsi leaves and bring it to a boil till the water absorbs its colour and flavor. After about 2-3 minutes, strain the tea and sip it hot! You can add honey and lemon for more added flavor and nutrients.

2. Mid-Morning Green Tea
Known as one of the world’s healthiest drinks, we are aware of the numerous health benefits of green tea and how it boosts the metabolic process. But do you know that there are some specific times in a day when green tea can do more harm than benefits?  For example, drinking green tea early morning on an empty stomach can increase the acidic environment in the gut or very close to the meals, when the tannins present in it can hamper the absorption of essential nutrients like iron, calcium, proteins from the food. An ideal time to drink this elixir is mid-morning, around 2 hours after your breakfast or 2 hours after lunch.

The natural antioxidants, catechins, which make about 30% of green teas’ nutrient content protect the body from cell damage, and prevent the occurrence of a variety of cancers and degenerative nerve cell disorders like Alzheimer’s.

How to Brew: Pour hot water over loose tea leaves or teabag. Let it steep for 3-5 minutes. Three minutes for mild flavor, five minutes for a robust full flavour as per your taste.

3. Afternoon Black Tea
Afternoon, around 1-2 hours after lunch is the time when we crave for tea the most. The feelings of dizziness, lethargy, sleepiness, heavy headedness all attack the body together and the need for an instant stimulant is unavoidable. At that time, ditch the harmful additives altogether (milk, sugar) and go for pure, super brain stimulant black tea. L-theanine, the amino acid present in tea increases alpha activity in the brain, resulting in relaxation, better focus and alertness. Black tea is also found to have positive effects on heart health by reducing the levels of LDL – the bad cholesterol when taken consistently.

How to Brew: Pour hot water over a tea bag or boil 2-3g of tea leaves with one cup of water. Let it steep for 3-5 minutes, depending on the flavour you prefer. Strain it and sip to enjoy the rush of energy!

4. Before bed Chamomile Tea
This is one of the best non-caffeinated drink which you can have at bedtime. Chamomile is a herb which comes from the daisy-like flowers of the Asteraceae family which have been used for centuries to reduce inflammation, anxiety and treat insomnia. The best time to relish this naturally sweet tea is 30 minutes before bedtime, as the antioxidant ‘epigenin’ present in it binds to benzodiazepine receptors in the brain that may decrease anxiety and cause mild sleepiness. Some studies have found it effective in positively reducing the anxiety during the postpartum period.

How to Brew: Pour hot water over tea bag or infuser. Let it steep for 3-5 minutes. Add in the flavour of your choice like lemon or mint leaves if needed and enjoy the calmness.

Tea For Home Remedies

Let’s see some age old remedial teas from our grandma’s kitchen!

1. Lemon Honey Tea for Cold and Sore Throat
It is one of the most popular drinks, especially in winters, which instantly soothes a sore throat and reduces congestion. Lemon helps in reducing congestion because of its anti-inflammatory action, while honey helps in soothing the throat.

How to Brew: Add the juice of half a lemon and one teaspoon of organic honey to one cup of hot or warm water and drink instantly!

2. Ginger Tea for Nausea
The active components present in ginger i.e. Gingerol and volatile oils have been found to be effective in reducing nausea caused by pregnancy, chemotherapy or post-surgery. It can also help in calming down the symptoms of motion sickness like dizziness, vomiting and cold sweats.

How to Brew: Add 3-4 slices of peeled, raw ginger in one and half cup of water and let it boil on medium heat for 10-20 minutes, depending on how strong you want it. Remove from heat and add in lemon and honey as per your taste.

3. Peppermint Tea for Bloating
Peppermint is one of the most widely used herbal tea all over the world as a home remedy for various health conditions. It is sometimes known as ‘stomach healer’, as it is known to soothe various gastrointestinal ailments, including stomachache, heartburns, bloating, indigestion and diarrhoea and to promote healthy digestion. It is particularly effective after a meal if you experience heartburn or at the onset of stomach problems.

How to Brew: Add fresh (preferably) or dried peppermint leaves to boiling water. Steep it for 5-10 minutes. Strain the leaves, drink it warm and not scalding hot.

Did you find this article helpful? Try some of these and share your experience with us in the comments below. For more on tea, check out Healthy Reads. You can also buy our select teas, curated by experts from the GOQii Health Store within the GOQii App. Download now!  

#BeTheForce 

September 16, 2020 By Saba Mirza 2 Comments

5 Yoga Asanas to Strengthen the Back

strengthen the backIf long working hours involving a lot of sitting time, incorrect posture and less exposure to sunlight sound similar to you, we’re sure you’ve at some point experienced back pain. Not just at work but traveling also takes a toll on your back muscles. You’ll be surprised to know that back injuries, simple back stiffness and back pain are quite prevalent even among the youth today. The only remedy here is to strengthen the back muscles!

Why Do You Need a Strong Back?

The back muscles are the backbone of the body. They help you maintain correct posture, improve balance and avoid injuries. If your back muscles aren’t strong enough, it can cause stiffness, minor aches and pains which can become problematic in the future, cramps, etc.

The most basic thing you can do to strengthen your back is to avoid long sitting hours, improve your calcium and Vitamin D intake. Improving flexibility is also crucial to prevent stiffness. When it comes to building flexibility and strength, nothing can beat yoga! Let’s look at a few asanas which are very effective in easing your back pain problems.

Asanas to Strengthen the Back

1. Tadasana (Mountain Pose):

strengthen the back
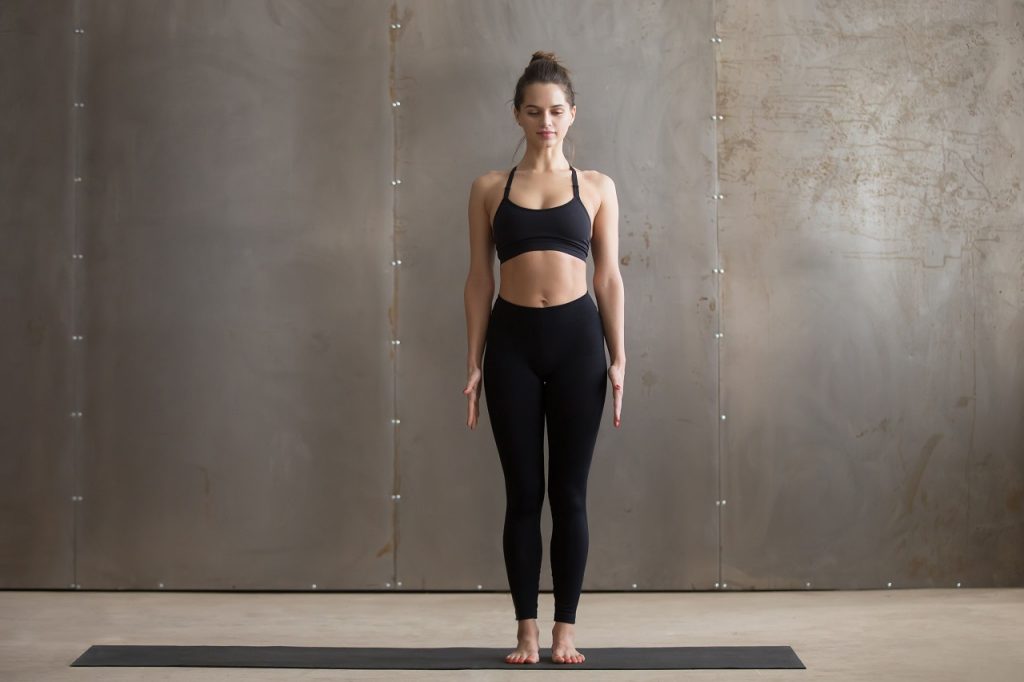
Tadasana is a basic asana for various standing yoga poses! It is excellent for improving posture, maintaining the curvature of your back and strengthening the hips and thigh muscles.

  1. Stand straight and keep a small gap between your feet
  2. Keep your hands straight on the sides, stretching the wrist and fingers
  3. Elongate and stretch your back, widen your collar bone and straighten your shoulder blade, relaxing them down the back
  4. Stand on your toes while stretching the knees, thighs and hip muscles without tightening the belly muscles.
  5. Stay in this pose for 20-30 seconds breathing easily.

 2. Virabhadrasana (Warrior Pose):

Virbhadrasana
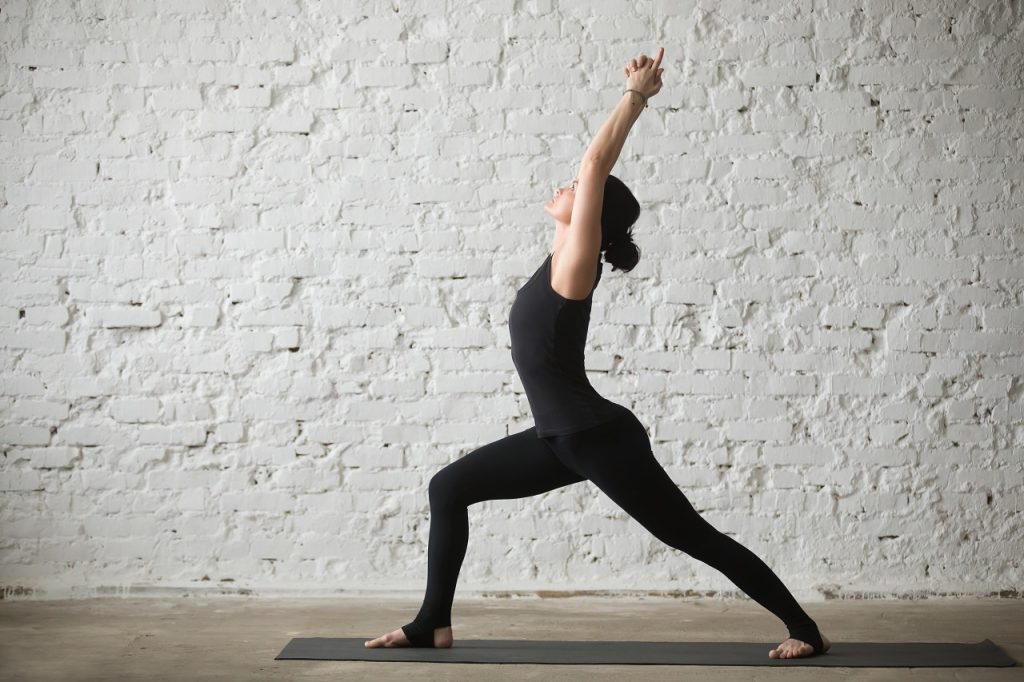
Widely known as the warrior pose, Virabhadrasana strengthens the knees, thigh muscles, opens the hips and chest as well as stretches the back and leg muscles.

  1. Stand in Tadasana pose and keep your feet around 4 feet apart
  2. Turn your left foot out by 90 degrees and left foot in by 15 degrees
  3. Bring both the hands above the head, join your palms and keep your eyes up at the thumbs
  4. Rotate your torso to the left, bend the knees while keeping them above the ankle (avoid bending more than that). Exhale.
  5. Stand in this posture for around 30 seconds.
  6. Straighten the knee while you inhale and bring your hand down
  7. Exhale and come back to the Tadasana pose.

 3. Trikonasana (Triangle Pose):

trikonasana
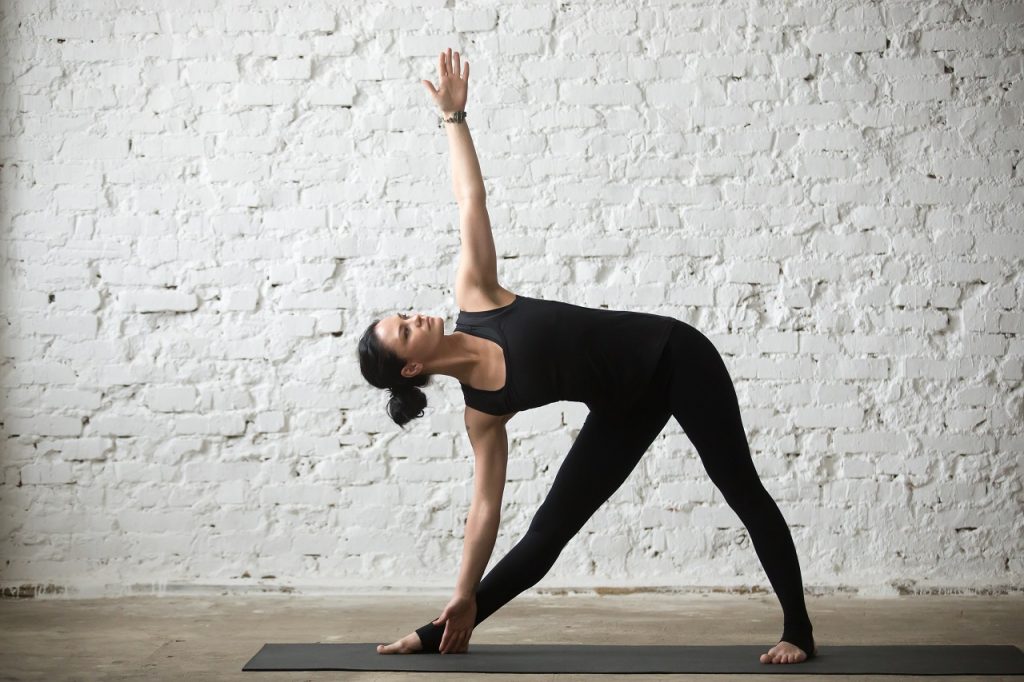
As the name suggests, it’s a triangle posture which stretches the spine, opens up the chest and shoulder as well as reduces tension on the hip and thigh muscles. It helps in improving physical and mental equilibrium.

  1. Stand in Tadasana pose and separate the feet wide apart, around four feet from each other
  2. Turn your right foot out 90 degrees and left foot in by 15 degrees. Now align the center of your right heel with the center of your arch of the left foot
  3. Inhale deeply and as you exhale, bend your body to the right, downward from the hips, keeping the waist straight, allowing your left hand to come up in the air while your right hand comes down towards the floor. Keep both arms in a straight line
  4. Rest your right hand on your shin, ankle, or the floor outside your right foot, whatever is possible without distorting the sides of the waist. Stretch your left arm toward the ceiling, in line with the top of your shoulders. Keep your head in a neutral position or turn it to the left, eyes gazing softly at the left palm.
  5. Ascertain that your body is bent sideways and not backward or forward. Pelvis and chest are wide open.
  6. Stretch maximum and be steady. Keep taking in long, deep breaths. With each exhalation, relax the body more and more. Just be with the body and the breath.
  7. As you inhale, come up, bring your arms down to your sides, and straighten your feet.
  8. Repeat the same on the other side.

 4. Matsyendrasana (Lord of the Fishes Pose):

lord of the fish pose
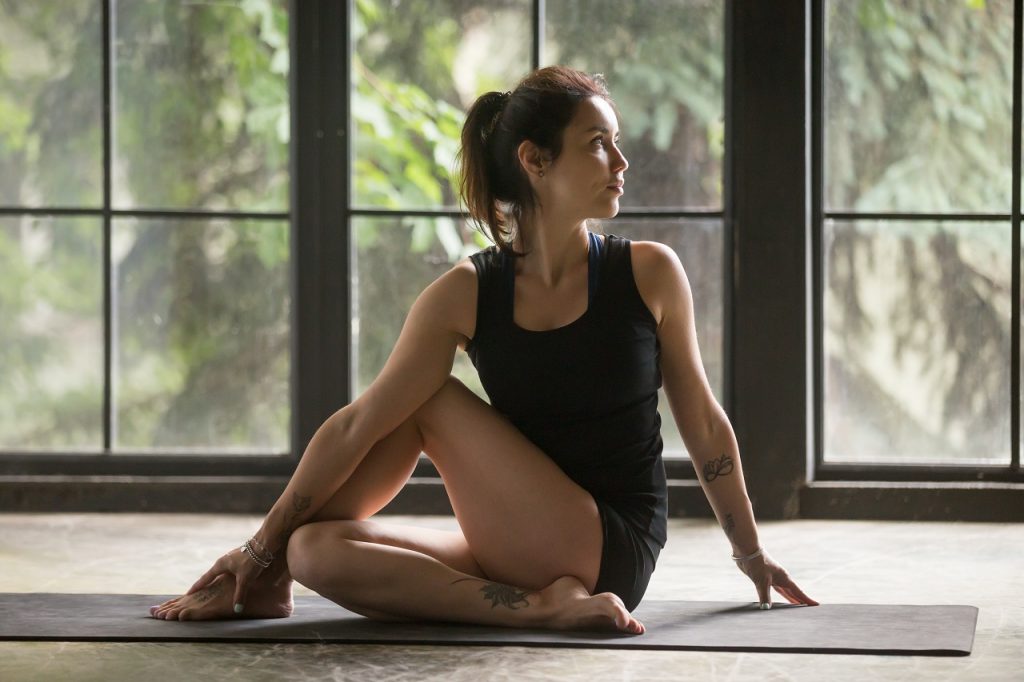
One of the best asanas to improve spinal health. It provides excellent compression and extension to the nerves and muscles supporting the back, increases elasticity of the spine, tones the spinal nerves and reduces the stiffness in the spinal muscles.

  1. Sit on the floor with legs straight in front of you. Keep the back erect
  2. Bend the left leg and place the heel of the left foot beside the right hip (optionally, you can keep the left leg straight)
  3. Take the right leg over the left knee
  4. Place the left hand on the right knee and the right hand behind you.
  5. Twist the waist, shoulders and neck in this sequence to the right and look over the right shoulder.
  6. Keep the spine erect.
  7. Hold and continue with gentle long breaths in and out
  8. Breathing out, release the right hand first (the hand behind you), release the waist, then the chest
  9. Release the neck and repeat on the other side
  10. Breathing out, come back to the front and relax

 5. Salabhasana (Locust Pose or Grasshopper Pose)

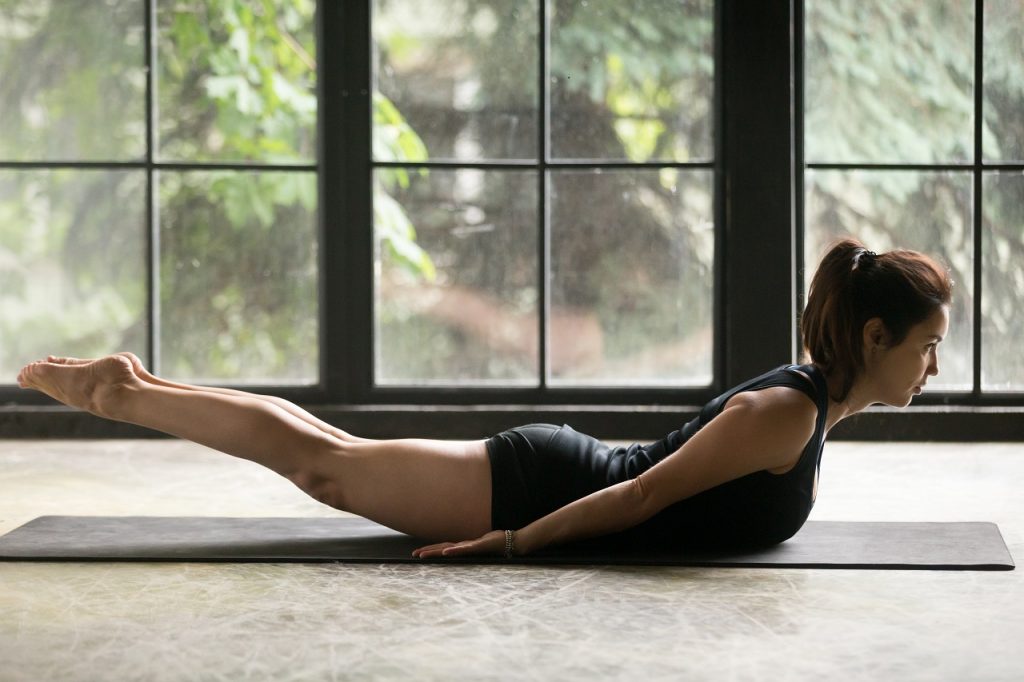
Salabhasana prepares beginners for a deeper backbend, strengthening the muscles of the entire torso from the nape of the neck, spine, chest, and legs to the back of the heels. It is a part of Hatha Yoga which stimulates the functioning of abdominal organs and relieves stress.

  1. Lie on your belly with your arms along the torso, palms up, forehead resting on the floor (use a yoga mat)
  2. Turn your big toes towards each other inwardly rotating your thighs and firm your buttocks
  3. Exhale and lift your head, upper torso, arms and legs away from the floor. You will be resting your entire weight on your lower ribs, belly and front pelvis
  4. Raise your arms parallel to the floor and stretch back actively through your fingertips. Press your scapula firmly into your back
  5. Keep the base of the skull lifted and back of the neck nicely long
  6. Stay in this asana for 15-30 seconds then release slowly with exhalation.

Practice these asanas regularly to strengthen the back but before you begin, do Consult your Doctor, Physiotherapist or Coach. For more sessions on yoga and to strengthen the back, check out LIVE sessions on GOQii Play.

#BeTheForce 

January 21, 2020 By Saba Mirza Leave a Comment

Effective Home Remedies For Sinus Congestion

sinus congestion

If you’ve suffered from sinus congestion at any point in your life, you’re well aware of how painful an experience it can be. Let’s deep dive into what it exactly is as well as learn some home remedies for sinus congestion.

What is Sinus Congestion?

Sinus congestion is a condition in which the cavities around your nasal passage get inflamed and congested. Symptoms appear in the form of a stuffy nose, pain around the nose, cheeks, jaw or forehead. One may even experience swollen or watery eyes and a sore throat.

There’s a surge in sinus congestion cases during winters primarily due to the dry, cold weather accompanied by an increase in pollutants and allergens in the environment. If there are no obstructive pathologies for the sinus blockage like polyps or deviated nasal septum, then a few home remedies for sinus congestion can help us soothe the inflamed nasal passage and reduce the intensity of the symptoms.

Effective Home Remedies You Should Try

1. Maintain Humidity:
Dryness in cold weather is amplified when you are using a room heater. Dry air makes the mucus thick. This clogs sinus cavities and causes pain and pressure on the surrounding tissues. Using a humidifier while running a room heater and keeping yourself hydrated can help in reducing the viscosity of the mucus, making it easy to drain it out and open the cavities up.

2. Drink Warm Fluids:
Warming your body with hot soups, curries and teas is an ancient measure, followed traditionally and ritually for ages! This is found to be quite effective in alleviating the symptoms of sinus congestion. Here are a few simple remedies which can be easily prepared at home:

  • Ginger-Turmeric Tea: Boil one-quarter teaspoon of dry ginger and turmeric in one cup of water and have that tea by adding lemon and pepper. It is very effective in soothing the sore respiratory mucosa and boosting immunity levels.
  • Immunity Booster: Take 2 black peppers, 2 cloves, 2 cardamoms, a small piece of cinnamon, small piece of ginger, Tulsi leaves, 2 garlic cloves and ½ teaspoon of ajwain. Boil it till the water becomes half in quantity, strain it and then have it hot with honey (preferably organic). Have this immunity booster drink two to three times a day. It will help you fight off various bacterial and viral infections.
  • Whole Leaves Green Tea: Being rich in antioxidants and polyphenols, green tea is found to be one of the most effective immunity booster and detox drink!

3. Warm Compresses:
Apply warm compresses by covering your face with a clean, warm and wet cloth which will moisten the nasal passages, thin out the mucus plug and help in easing its drain, thus opening the cavities up!

4. Steam Inhalation:
Steam inhalation is found to be quite effective in moistening the air passages and reducing the congestion by loosening the mucus. Use a bowl of hot water, add a few drops of an essential oil like menthol, eucalyptus or lemon juice and cover yourself with a thick towel to trap the steam inside!

5. Nasal Irrigation:
Nasal irrigation simply means flushing out the nasal pathway with a saline solution. It helps remove allergens, irritants and excess mucus! You can use a nasal irrigation system like a Neti Pot, squeeze bottle or bulb syringes filled with saline solution, which you can get at a medical store. 

You can also make a saline solution at home by mixing 3 teaspoons of salt and 1 teaspoon of baking soda. Use sea salt or pickling salt and not iodized salt or table salt which is added with additives. Store it in airtight container!

  • How to Do Saline Irrigation: Put the above mixture into a clean Neti Pot or bulb syringe and stand near a sink. Place the spout in the top nostril and pour or gently spray a liberal amount of solution into one nostril, while tilting the head at 45 degrees, so that it flows through the nasal cavity and out of the other nostril! Blow your nose to get rid of any remaining water. Repeat the process on the other nostril.

6. Eliminate the Causative Factors:
Factors which can aggravate the symptoms are allergens like smoke, dust particles, perfumes, hair spray, cleaning products and anything which releases fumes! Try to keep the air around you clean from all these irritants!

While these home remedies for sinus congestion are effective, they only tackle the symptoms. If the issue persists, you should consult your doctor. For more home remedies, you can check out the Healthy Reads section in the app or tune in to experts on GOQii Play. 

  • 1
  • 2
  • 3
  • 4
  • Next Page »

Search

Recent Posts

  • Sleep Well Without Electronics
  • Nutrition Guidelines For Seniors During Winter
  • 5 Ways To Keep Your Lungs Healthy
  • 5 Tips To Stay Active During Winter
  • Nikita Jain Battles A Rare Condition & Wins With The Right Coaching

Stay Updated

Archives

  • January 2021 (24)
  • December 2020 (27)
  • November 2020 (25)
  • October 2020 (27)
  • September 2020 (26)
  • August 2020 (26)
  • July 2020 (27)
  • June 2020 (27)
  • May 2020 (25)
  • April 2020 (26)
  • March 2020 (24)
  • February 2020 (22)
  • January 2020 (17)
  • December 2019 (21)
  • November 2019 (24)
  • October 2019 (25)
  • September 2019 (24)
  • August 2019 (18)
  • July 2019 (23)
  • June 2019 (22)
  • May 2019 (25)
  • April 2019 (24)
  • March 2019 (23)
  • February 2019 (21)
  • January 2019 (25)
  • December 2018 (17)
  • November 2018 (11)
  • October 2018 (12)
  • September 2018 (13)
  • August 2018 (23)
  • July 2018 (17)
  • June 2018 (23)
  • May 2018 (17)
  • April 2018 (28)
  • March 2018 (19)
  • February 2018 (14)
  • January 2018 (22)
  • December 2017 (16)
  • November 2017 (28)
  • October 2017 (22)
  • September 2017 (23)
  • August 2017 (10)
  • July 2017 (12)
  • June 2017 (13)
  • May 2017 (14)
  • April 2017 (9)
  • March 2017 (7)
  • February 2017 (7)
  • January 2017 (12)
  • December 2016 (10)
  • November 2016 (8)
  • October 2016 (9)
  • September 2016 (8)
  • August 2016 (13)
  • July 2016 (11)
  • June 2016 (10)
  • May 2016 (13)
  • April 2016 (18)
  • March 2016 (19)
  • February 2016 (8)
  • January 2016 (8)
  • December 2015 (6)
  • November 2015 (10)
  • October 2015 (8)
  • September 2015 (10)
  • August 2015 (14)
  • July 2015 (12)
  • June 2015 (15)
  • May 2015 (9)
  • April 2015 (13)
  • March 2015 (10)
  • February 2015 (6)
  • January 2015 (13)
  • December 2014 (14)
  • November 2014 (12)
  • October 2014 (6)
  • September 2014 (16)
  • August 2014 (14)
  • July 2014 (9)
  • June 2014 (3)
  • May 2014 (8)
  • April 2014 (5)
Nikita Jain

Nikita Jain Battles A Rare Condition & Wins With The Right Coaching

The pandemic wasn’t easy on a lot of us. The entire lockdown, coupled with social distancing and movement restriction impacted a lot of people in different ways. A unique problem that one of our players Nikita Jain suffered from was Vocal Cord Dysfunction - a … [Read More...]

Mukul Bhartiya

Always Look At The Big Picture – Mukul Bhartiya User Journey

We often treat health as a one off objective but what happens once we achieve our goal? Do we fall back to our previous habits? While keeping health goals, it is important to always look at the big picture. While losing weight is a good target, being healthy should always be a lifelong goal! This […]

Rohit Khatri

Getting A Push To A Healthier Lifestyle – Rohit Khatri User Journey

The choices we make early in life often determine our current predicaments. Unhealthy choices always lead to unhealthy consequences. But it doesn’t have to stay that way. It is never too late to make a shift to healthier choices. Lifestyle diseases can be reversed and you can live a healthy and fulfilling life. When things […]

Nalin Talwar

Nalin Talwar Goes From Couch Potato To Fitness Freak!

Can you make a positive lifestyle change in just 3 months? Is it even possible? After completing 3 months with GOQii, our player, Nalin Talwar decided that it’s a good time to share his experience. He did face some unfavourable experience with the hardware but for most of it, his overall experience has been good. […]

  • HOME
  • HEALTHY LIVING
  • FITNESS
  • HEALTHY RECIPES
  • USER STORIES
  • KARMA
  • BUY GOQii

Copyright ©2016 GOQii